Wednesday, May 22, 2013

Welcome Spring!

For as long as it took Old Man Winter to arrive last fall, he sure hasn't been shy about loitering around this spring.  Despite the bright sunshine, the air has had a definite chill most days.  It's only been the past few mornings that we haven't worn our winter barn coats to go out and do chores.

I've washed all our winter coats a couple of times now in anticipation of packing them away for the summer but we keep having to pull them out again.  I washed them again yesterday and they're hanging on the line to dry - hopefully for the last time this spring! 

The cold weather hasn't kept the plants and pastures from springing to life.  The garden was all overgrown.

 
We use 4 X 4 raised beds for our garden.  The beds are kind of expensive to put in initially but they do have many advantages.  The size of the bed makes it easy to reach each plant from one of the sides and, since you never walk on the soil, the dirt stays nice and fluffy.  This is a huge advantage when weeding - the weeds are easy to pluck before they get rooted in.  For monster weeds, like the ones that were growing out there this spring, this tool is invaluable. 
 
 
It allows you to reach down along the root of the weed and pull it up from the bottom.
 
When we first put the garden in, we tried laying weed blocking fabric under the whole plot then building our boxes then we spread mulch on the paths between each box.  The boxes performed beautifully but the paths were soon overrun with weeds.  Since we don't like to use chemicals or herbicides, they became very difficult to maintain. 
 
The second year we decided to move the boxes further apart so there was plenty of room to crouch beside the beds and also so we could run the push mower between them.  Now we just mow off the garden paths whenever the grass gets high.
 
We also pull the weeds and grass from around the base of the beds.  This keeps the grass from growing up through the bottom of the bed.  It's still able to grow up into the bed despite the weed blocking fabric so it's just easier to clear the plants away altogether.
 
 
We make squares for each bed so it's easy to diagram and remember where we've planted.  To do this we simply stretched nylon string from one side to the other.  The string holds it's shape and doesn't wear out very quickly.  It's held in place with small nails.  When we want to work the whole bed it's easy to unhook just one side and pull the string out of the way.
 
 
You can find out more about this method of planting in the book, "Square Foot Gardening" by Mel Bartholomew.  It's a great book with tons of hints and tips and exact instructions on making the beds and the supports for climbing plants.
 
Ready to plant.
 
Thanks for stopping by and happy spring!

Happy Birthday, DH!

DH and I will celebrate fifteen years of marriage this summer.  That means I've made Mrs. Field's Carrot Cake at least fifteen times.  Probably more, since it's the one cake he requests for his birthday year after year.

 
I use the recipe DH's mom wrote out for me.  Low fat, it's not. Two bricks of cream cheese and an entire pound of butter!


I gathered the ingredients and the kitchen tools I'd need; strainer for the crushed pineapple, chopper for the walnuts, Kitchenaid to shred the carrots and the hand mixer for the batter.


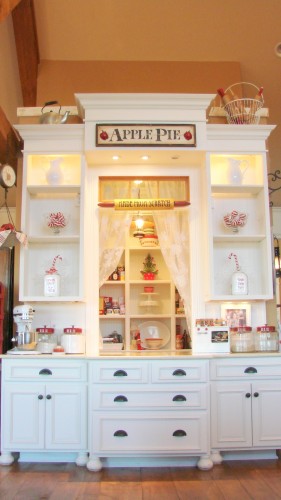
The job was made easier since we've organized all our baking needs into one place.  I got the idea from this fun blog, Sugar Pie Farmhouse.

dsc06808
 
Okay, so Aunt Ruthie's baking center is a little more grand!  Ha, ha.  But I liked her idea of having everything for baking all in one spot.  We made our island this winter by putting four kitchen cabinets back to back and topping them with a butcher block top.  A couple coats of red paint and added casters at each corner so, if need be, it can be pushed against the wall to make more room. 


Once the batter is made up, add the extras; raisins, shredded carrot, chopped walnuts and crushed pineapple.

 
This year I made it a triple layer cake but it can also be made as a double layer.


Happy Birthday, DH!
 
Mrs. Field's Carrot Cake
 
Stir together:


2 1/2 cups flour
2 tsp. baking soda
1/4 tsp. salt
2 tsp. cinnamon
1 cup light brown sugar, packed
1 cup white sugar
 
1 1/2 cups salted butter, softened
3 large eggs
2 tsp. vanilla
Add the butter and only one egg and the vanilla and blend on low.  Beat on medium for two minutes then add the other two eggs one at a time beating 30 seconds after each.
 
3 cups grated carrots (3-4 medium)
1/2 cup crushed pineapple, drained
1 cup raisins
1 cup (4 oz.) chopped walnuts
Add and blend on low.
 
Pour into 2 nine inch pans (or 3 eight inch) that have been greased and floured .  Bake at 350 for 60-70 minutes or until a toothpick comes out clean.  (The three layers took only 35 minutes.)  Invert immediately onto cooling racks.  Let cool 10 minutes then carefully lift off the pans.
 
Cream Cheese Icing
16 oz. cream cheese, softened
1/2 cup salted butter, softened
1 T. fresh lemon juice
2 tsp. vanilla
3 cups confectioners sugar
 
Cream together the cream cheese and butter then add the lemon juice and vanilla.  Gradually add the confectioners sugar and blend on low until smooth.
 
Spread plenty of frosting between each layer and over the cake. 
 
 
Enjoy!